Physical Address
304 North Cardinal St.
Dorchester Center, MA 02124
Physical Address
304 North Cardinal St.
Dorchester Center, MA 02124

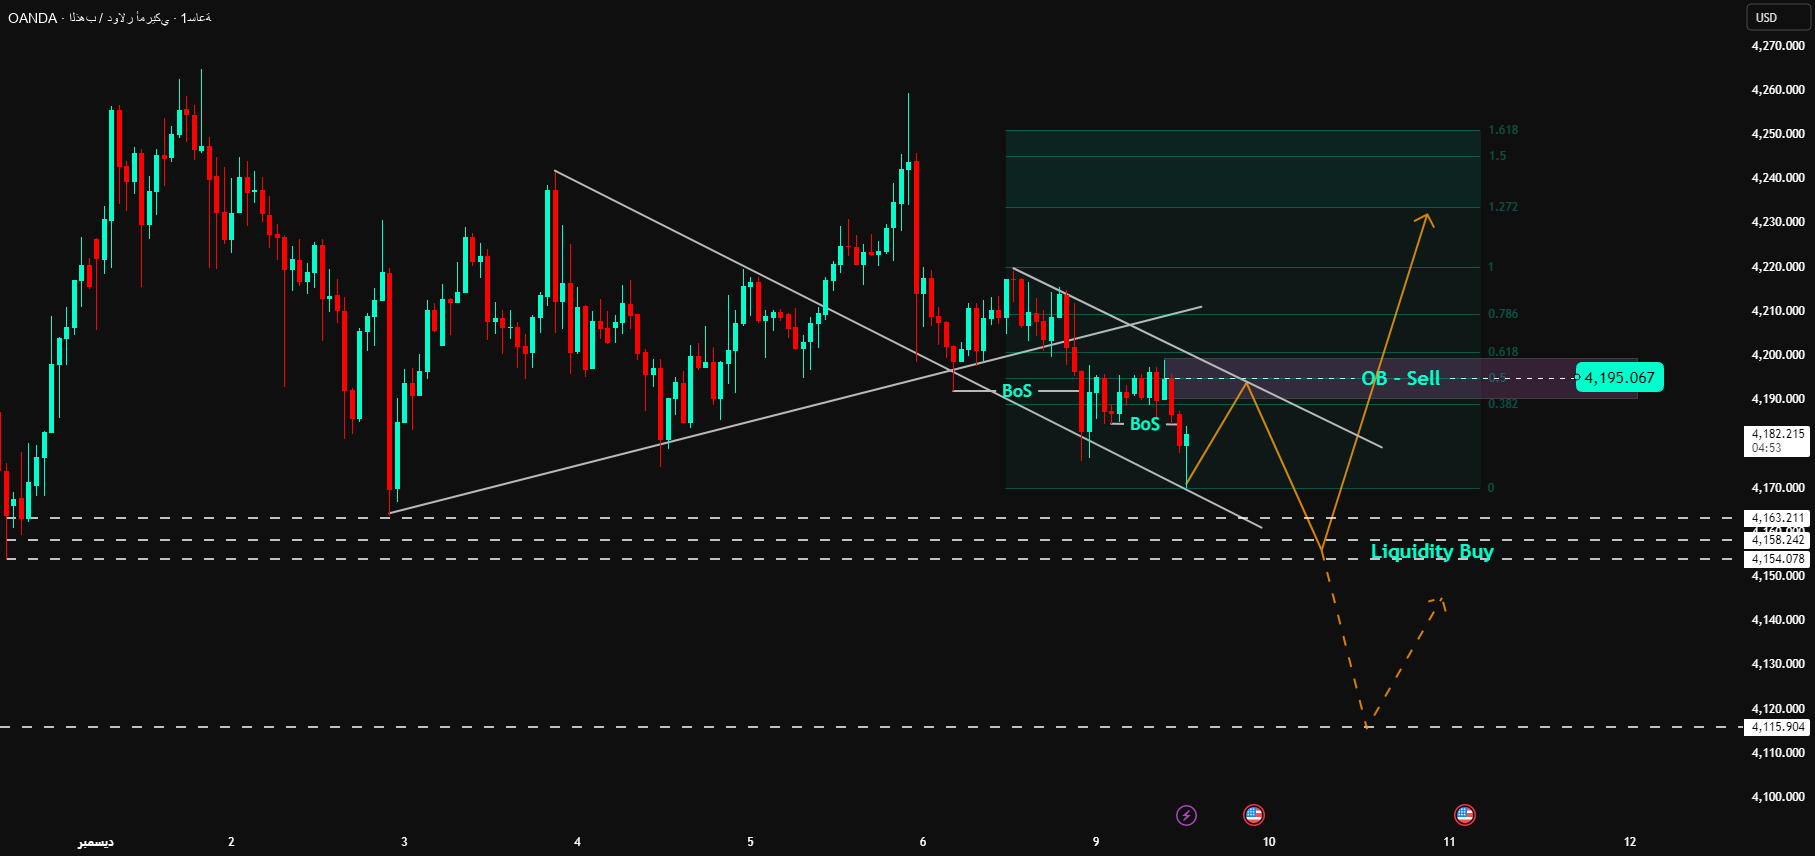

1. Market structure (first half of the year)
Gold is in a bearish correction phase after breaking out of its previous bullish structure. Starting from the area near the top, the price keeps forming bearish BoS waves, which confirms that selling power is under control in the short term.
Currently, the price is moving within a descending channel and has retested the trendline area multiple times but failed to break out. This reinforces the scenario that price will complete a deeper downward wave to gather liquidity before forming a sharp rebound wave.
2. Important technical areas on the chart
🔹 OB – Sales Area: 4,190 – 4,197
The Fibonacci confluence point of the last downward wave is 0.5 – 0.618.
This is the H1 supply area where the price breaks out of the previous bearish structure → it is best to pay attention to selling when the price rises.
🔹Liquidity buying area: 4,154 – 4,163
The liquidity pool is located right below near the bottom.
In this area, the market can easily form an SL (liquidity sweep) before a bullish reversal.
🔹Deep Liquidity Zone: 4,115 – 4,12x
Several old lows formed since the beginning of the month confirm areas of deep liquidity.
If price is pushed here, this will be a very strong buying area for the next big pullback wave.
3. Transaction scenarios divided according to structure – clear and easy to understand
🔸 Scenario 1 – Selling from OB 4,19x (main scenario)
Activation conditions:
Price returns to OB sell area 4,19 times
M15–H1 reversal signals appear: strong rejection candle, bearish ChoCH, engulfing
Target:
TP1: 4,163 (Liquidity)
TP2: 4,154
TP3 expansion: 4,12x – 4,115
NOTE: This OB area is a beautiful confluence – if the price reaction is strong, the market will most likely follow this pattern to complete a downward wave.
🔸 Scenario 2 – Purchase based on liquidity survey (after-sales priority)
After completing the downward wave in the liquidity area:
Buy Zone 1: 4,154 – 4,163
Waiting for bottom to clear, ChoCH bullish → buy based on pullback wave
Buy zone 2: 4,115 – 4,12x (strongest buy)
If the price breaks through the 4.15x liquidity zone
This is the area where maximum purchasing power is likely to occur → a new first half bottom is expected to form
Goals for both regions:
TP1: 4,195 (OB sales retest)
TP2: 4,210
TP3 extension: 4.23x – 4.24x
Farthest: 4.25x – 4.27x (Fibo 1.272 – 1.618)
4. Important tips and risk management
Don’t buy when price is within a descending channel – wait for clearance and confirmation.
Selling is only valid when the price touches OB 4.19x, avoid selling for fear of losing money in this area.
If H1 falls below 4,110 points, the buy will be invalid.
A strong rebound scenario will be activated only if the first half closes above 4,200 points.